Monday, 24 February 2014

New Pattern Pack Release

Hi fellow crafters!

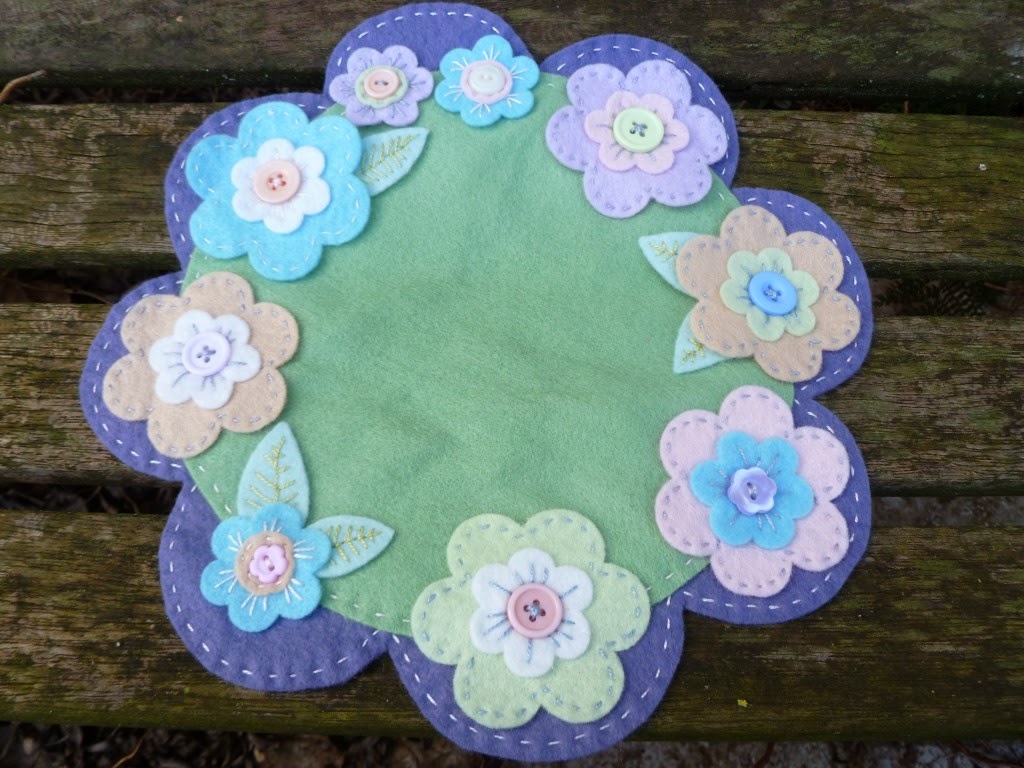
It has been a while since I last released some pattern packs but I have decided that the time is ripe! The first of the patterns is a little felt penny mat called Spring Fling! and it is a really nice beginners make for Easter coming up! (sorry but the year is scooting by!).

Anyway, let's not worry about the calendar, have a look at the pattern pack.....


This one is now live and it features step-by-step instructions with photos and everything that you need to get started.

And there are more to come! Look out in the next days for the rest of the planned packs - something for everyone...
For the sewists, a cushion...


The quilters, a nice lap quilt....


 Not to forget the decorative painters among us.... ducklings for Easter....


And the first of the prim painting patterns, a nice wall clock. Sort of prim but could fit into the shabby chic home too.


You can find all of these patterns for sale at my Etsy shop - the folk art factory and they are available for instant download. If you have any issues at all, please contact me at thefolkartfactory@hotmail.co.uk and I will help you if I possibly can.

Thanks so much for dropping by and  happy crafting!
Love and hugs
Debs
xxx

Sunday, 16 February 2014

Doggy Bathrobe!

Good Afternoon All!

I have something for the sewists today - and especially those with a dog. I have been thinking for some time about making Sally a bathrobe and today I actually got my act together and I have made it. Looks good too although madam doesn't agree. Could mean a bath......

Have a look and see and then I will tell you how I got to this point!


Not a terribly flattering photo of the dog but let's concentrate on the bathrobe and I will point out its features.
It is made from a bath towel so it is cheap and very thirsty on a wet dog. it has a 'snood' (the hood bit) which is superb for drying ears. It has a wide belt with hook and loop tape to fasten and that means it stays put but there are no fiddly closures. It is washable and a lot more robust than it looks. But choose the towel carefully. I am disappointed with my choice which is zippering already. Some of the velour type towels are better I think.

So what will you need? Firstly, a bath towel in the colour of your choice and big enough to fit your dog.  You will also need some printed cotton fabric for the trims, some hook and loop tape, wide elastic, brown paper and a pencil and your usual hand and machine sewing needs.

There is no actual pattern for this, I will show you how to make your own. take a tape measure and measure along your dog's back from neck to tail. Now measure the length to the dog's knees. Finally, measure the length from the middle of the chest to the tail. Transfer these measurements to a piece of brown paper. Mark a curve for the neck and you should have a pattern which looks something like this....


I have rounded the back section off too but this is only a design feature and serves no practical function.

Cut out the coat, placing the top of the pattern (the neck to tail measurement) on the fold of the fabric.


Sew the front (chest) seam down and try it on the dog.


I have put some darts at the neck for shape too. Sew these as well.


Not a happy camper! But very patient all the same. She shall have salmon........
The snood is made from a tube which extends about half way up the dog's face.


Use the patterned fabric to make a casing for the elastic. The width will depend on the width of the elastic and the wider, the more comfortable it is.


Machine sew this and then add the elastic and slip stitch closed.


Next, make the belt. I cut a piece of cotton fabric about 15 cm wide and as round as the dog plus another half.

Fit it on the dog to find a good and comfortable place for it to sit and pin it carefully in place. position the hook and loop tape too.


 Sew that all on and then make some bias binding from the cotton fabric to bind the edge.


Neaten off any stray threads and consider stabilizing the inner raw edges too, depending on which sort of towel you have chosen.


Now we are back to the first photo again - a disgruntled dog in a bath robe! Trust me, these robes are worth their weight in gold! The dog can shake all she likes and the furniture will not get wet and the dog doesn't get cold. She will dry in half the time!

Looks cute too!

Happy sewing and thanks for stopping by!

Love and hugs
Debs
xxx

Tuesday, 21 January 2014

Make Your Own Faux Washi Tape!

Morning all and welcome to Tuesday!!

I have been playing around with some effects on tape to create a homemade faux washi tape and it occurred to me that I may not be the only person interested in it!

But why on earth would you bother??? Well, for one, you can customise it to any project. When you buy a roll of real washi tape, you may only need a little bit and then the roll goes in the box (with the other 47) and you wait for the day when you might need it again.

Secondly, we are not going to use inks! No really. This technique uses acrylic paint. The reason for this is that not only are the colours endless and endlessly mixable to create new ones but they are inexpensive, last forever (practically), they come in different effects - think metallics and you can also layer up light over dark. Today's project looks at white over the colours. Bliss! We will turn to the wonderful DecoArt range for today and you will see what I mean by easy and beautiful!

Take a look...


Very easy to do too and here's how....
First, gather your supplies. You will need some tape. I chose some really cheap masking tape from a discount store. Have a look around for this tape in other places too and see if you can find it in different widths. I am using a reasonably regular one. You can cut it too.
Next, grab some acrylic paints. I am using the following colours by DecoArt Americana:
Lamp Black
Cool White
Blue Harbour
Mint Julep

Now look in your stamp stash for some small scale stamps to suit the mood that you are in. Small scale is necessary because if they are too big, you will not be able to see what they are when you use them. I chose flowers, little birds, flourishes, borders and butterflies.

Finally, you need some tools - something to put water in, a paper plate as a palette, a sea sponge, #12 flat brush, nappy (wet) wipes and one of those tricky non-stick sheets.


So, here we go! Firstly, lay the tape onto the non-stick sheet.


Then put the Mint Julep paint onto the paper plate and wet the sponge. wring all of the water out and sponge the green onto the tape at random.


Wash the sponge and repeat with the Harbour Blue.


Go over again a couple of times with each colour to make the effect more subtle.


When you have the background in place, dry it and get busy with the stamps! Firstly though, prepare yourself a little 'ink pad' from the black paint. Do this directly onto the non-stick sheet and spread the paint out with the #12 flat brush. You will need to work quickly because acrylic paint dries very fast - this is both a good and a bad thing!


Simply press your chosen stamp into the paint and stamp as you would normally. You will need to wipe the paint off and refresh it occasionally. Use a wet wipe for this.


As you can see, I have made some stamps off the side of the tape and some straight, angled and so on. Now put some white paint onto the sheet and stamp right over the top....


This adds dimension, depth and interest to the piece. It looks a bit of a mess at this point but hang in there! Oh, and a word of warning, wash your stamps in cold water IMMEDIATELY as the paint will dry and ruin them!

Finally, take the tape away and wipe the sheet.  They look neater now!


Store them on a non-stick surface like a bottle. Or make them as you need them for a project. This will open up a whole new world of possibility, you will look at your stamps differently too!

Happy stamping and thanks for stopping by!

Love Debs
xxx

Thursday, 16 January 2014

Yay! The New Book is Live!

Hi all - Exciting day! Finally my latest book is available from Amazon Kindle today.

Whew - let me back up a little here! Have a look at the cover first of all....


Thia book is all about how to turn your favourite craft - whatever that might be into a rewarding and paying business.

When I lived in Australia, I taught craft from my home for around 12 years and I found it a wonderful experience. I met new friends through it, learned a lot about myself and made money. When my husband's job started to look a bit less than healthy, I supported us too. Teaching gave us security in more ways than one.

And now it is your turn! I have put everything that I have learned into this book so that you can benefit too. I take the reader through everything that you need to know to set up your space, advertise, attract students, deal with the practical issues and problems which arise when you invite strangers into your space, planning a curriculum and, above all, the Debbie von Grabler-Crozier method of teaching.

Visit Amazon and have a look inside - my style of writing is plain English, straightforward and I tell it exactly as I found it from experience. You will have the benefit of all the things that I learned the hard way.

I do hope that you like it and that you can get some benefit from it as I did - craft is undergoing a wonderful surge in popularity at the moment - teaching it to others can be the beginning of the rest of your life!

Thanks for stopping by!
Debs
xxx

Wednesday, 15 January 2014

Stamping and Book Pages

Hello all and welcome once again to by blog.

I was wandering through my library not so long ago and I came across an old French dictionary which I never use - I hasten to add here  that this book is too old to be useful in the normal sense but it is not so old as to be valuable and do make that distinction when you are searching for a book to use in craft projects. If it is a first edition, make sure that it isn't worth more than the house!

I am loving stamping and colouring the images with Tim Holtz Distress markers at the moment and I thought that I would show you a few examples.

These are so easy to do as well, simply choose a book which is slightly older - one with a bit of age and the older style papers look lovely and mellow and they are useful for so many crafts.


Tear out the page and get stamping! I chose a couple of birds for this first one and a branch from a completely different stamp set. Think of your stamps as individuals rather than a set which comes together. as individuals you can break them up and use them anywhere. I have had a few which were, strictly speaking, joined together. They looked better when cut up and I have used them constantly since.

The images are all stamped with Ranger Archival Ink in black. This is a more serious type of ink and it is permanent. This is good in this setting because it means that the ink will not smudge and it will not come off onto the markers.

I have used the Distress Markers here to colour and shade the images  and then make a shadow effect around the bird too. To achieve this, make a line with the thick (brush) end and immediately smudge it out with your finger. You have to work like lightening because it dries really quickly but the results are worth it.

Here are some ladybugs made the same way....


I have been a little creative with the colours too. One is traditional red but I have gone for a green and a blue one to see what they would look like.

When you are using this technique, choose three values of each colour marker. A colour value means the lightness or darkness of the colour. It doesn't matter which colours are used, go through your stash and use what you have. The main thing is to use the colours and then to remember the rule of thirds.

The rule of thirds means that the first layer of colour is to be 3/3 - total coverage. The next layer is 2/3 - some of layer one showing through and the last layer is 1/3 - highlighting. Imagine if you coloured something completely each time. No point to that!

With most paints, you can leave the highlighting layer to the last one - think acrylics. With Distress Markers however, because they are transparent, you will do it all in reverse, like water colour. Layer one is the lightest shade (3/3), layer two is the medium (2/3) and layer three (1/3) is the darkest one and is used the least.


Have a look at what I mean with the little girl in the rain above. You can see on the jacket how the shading effect works out. Once it is learned and practised, it will work out every time. Bliss!


Finally for this series are the butterflies to show you another application of the technique. Have a go and see what you can come up with. Then use these images in your cards and layouts. They are money in the bank for Mixed Media projects too.

Thanks for stopping by and happy crafting
love Debs
xxx

Monday, 13 January 2014

Cupids For Valentine's Day

Well hey there again!

I know that I am a little early for Valentine's Day but trust me, it is looming and I thought that I would create some different ideas for you to use on cards and papercraft layouts.

Enter three different cupids - actually it is the one cupid three ways but I reckon that you have that one sorted out....


The first one has been painted and stamped.


The second one is burnished with glod and polished. I added a paper flower and a drape for modesty.


The third one is my favourite - bronze with patina.

Lovely. But how is it done? Well firstly, begin with the Tim Holtz Alterations die, Cupid, Arrow and Hearts and your Big Shot die cutter. then you will need some chipboard. Cut out a cupid and an arrow. You will need this first step for any of the three.


Chipboard is just that little bit more substantial  than paper and it paints up really well. If you haven't got access to this equipment have a look on eBay - I have lit on the mad idea to sell these cutouts in a pack of three. I will post a link when I get sorted out.

Okay, Let's begin with the stamped one. You will neeed DecoArt acrylic paint in Light Mocha and a #12 flat brush. You will also need Dew Drop ink in Espresso Truffle. Finally, grab a stamp which grabs you (interesting mental image there) and some black ink. I have used Ranger Archival in Jet Black.

Basecoat the cupid with the paint and allow it to dry. Ink the edges with Espresso Truffle. It should look something like this....


You will notice that the inking is not perfect. It isn't supposed to be. Now ink with your chosen stamp. I have used a sheet music one abut I am not utterly convinced that it is a good idea. The horizontal lines are a little too pronounced. A more subtle choice may have been better.


When you ink with the black ink, it makes a really nice bright and crisp image. Soften it a little to make it look older by sanding it VERY CAREFULLY. Remember that you are working with card. Repeat all of these steps on the arrow if you haven't done that already and then glue the arrow into place.

Cupid number two is the one with the fabric wrap. Go with the DecoArt paint - Light Mocha again and allow to dry. now use another great decoArt product, Metallic Lustre in Iced Espresso. This is a grand product which brushes on, dries and then you can polish it to a lustre with a soft cloth. I used a Kleenex! The paint washes up in water too.


I wrapped a small scrap of tulle around this cupid in the style of any of the old masters. You can stop there or add a bow, some ribbon and a flower. The pearl in the centre finishes it off nicely. I used my hot glue gun for all of this. Quick and professional looking.


Here he is again.

Right, this next one is my favourite at the moment. I am loving bronze with a patina of age.


This one is the most work but it is still really easy and you can make this even if you have never even SEEN a paint brush. You do need to be able to spread butter onto bread though - you will see what I mean in a mo.

Firstly, what will we need? DecoArt products are Paintable Stucco, Acrylic Paints in Soft Black and Colonial Green, Dazzling Metallics (Glorious Gold) and (Worn Penny) and Metallic Lustre in Copper Kettle. Add a #12 flat brush and a #12 blender mop too. You will need your hot glue gun and a small palette knife too.

Glue the arrow on first this time and begin painting  by spreading the Paintable Stucco onto the card like spreading butter onto bread. Use the palette knife and make it rough.


Allow to dry and basecoat all over with the Soft Black paint using the #12 flat brush. Mix Worn Penny and Glorious Gold together (1:1) and paint this all over next.


Now take  the blender mop brush and paint in a stippling motion (bouncing up and down) - the brush, not you.....with Colonial Green. Allow some of the metallic layer to show through.


Finally, and with a very dry brush, burnish with Copper Kettle very sparingly and mainly over the high ridges of texture. Now you can see why you needed to roughen up this surface a bit. The good news is, if you hate what you are doing, basecoat over it and start again - usually from the first metallic layer. The burnishing and patina needs a little more practice but it is still easy. have a go and surprise yourself!


When the Metallic Lustre is dry, polish it with a soft cloth and you will see a beautiful glow.

You can use these little guys on cards and scrapbook layouts or anything else which takes your fancy. Consider wedding things and papier mache gift boxes. And you can use them either way around if you want the classically symmetrical look.

Have fun and let me know how you do!

Thanks for stopping by
Love and hugs
Debs
xxx