Tuesday 24 December 2013

A Beautiful Christmas!

Merry Christmas All!

Well we have romped home once more and this time I have a card for my beautiful Mum for Christmas - quite safe on here because she does not use a computer!

Please forgive the lack of detail shots - I   took the photos that I thought would be useful, packed the card and then very cleverly deleted the detail shots by accident! Very useful!

But I am sure that you will forgive me and mostly you can see what is going on from the photo here.


I wanted to achieve a really tasteful card with the grey skies of winter and a fall of glittering snow (no amount of detail shots would have helped there!

I started with a palette of greys and black and white. The card blank is quite large ( 15cm x21cm) and I cut a piece of  black and white ViviGade paper (a scandinavian company) plus a piece of grey smokey paper from the same company. I inked the edges with Ranger Distress Ink (Tim Holtz) in Pumice Stone, stamped some random snowflakes and, because my mum loves music, also some sheet music and sewed the grey paper to the black and white. I spent some time distressing and curling the edges of the paper too - it works better to make any larger tears before sewing.

This was great but still a little dull so I heat embossed some holographic snowflakes also at random, over the card.

Still with Tim Holtz, I cut a neutral grey Tattered Ponsettia with my trusty Big Shot die cutter and inked the edges with Mowed Lawn for the background and Barn Door for the top of the flower. This was a little loud so I went over with Vintage Photo ink to calm it all down. That worked a treat! Instead of using the die cut centre for the pointsettia, I used a really big flat backed pearl in the color green that my Mum loves best.

Some green ribbon and some grey patterned ribbon over the top of that with a matching bow really set it all off. Tuck the ribbon all around the back of the black and white paper for neatness.

The words up the top are some red washi tape and I wrote out a lot of random words in a nice font (courier in this case) and cut them up. They received a treatment with Pumice Stone ink too so that they did not leap out too much and I adhered them to the tape.
Next I went around the edges, just on the black and white paper with some DecoArt Glamour Dust to make that sparkle nicely in the background.

Finally, use your favourite method to adhere the completed card front to the card stock.

That's all folks!

I know that this is a little late for Christmas but I hope that this fairly timeless design will be the start of something big for next year.

in the mean time, have  very Merry Christmas and a safe and healthy New Year!

Thanks for stopping by!
Debs
xxx


Friday 13 December 2013

Stamping With Acrylic Paint

Hi All!

Well it is getting closer to Christmas and I have been so busy with my day job, writing furiously for the year ahead - magazine world is such a strange place to live, that I have not had a chance to post anything remotely Christmassy! Let's do something about that right now!!

Normally when papercrafters and card makers talk about stamping, they reach for their favourite ink pad. But there is another way. Consider acrylic paints! I love DecoArt for their general versatility and now I can add stamping to the mix.

Before we begin though, I want to do the right thing and thank the wonderfully talented Andy Skinner for showing this idea. We have much for which to thank him!

So. What do we need? Firstly, we need some paints. DecoArt have litterally dozens of gorgeous colours and then they all mix together ad infinitum so the sky is literally the limit.


Next you need a stamp or two. Let's choose something Christmassy for the sake of this particular argument.

A brush is also needed and make it a flat one to make the spreading of the paint easier. I use a 3/4 flat brush. This is a really good all rounder and it makes a welcome addition to your kit. Incidentally, if you are new to painting and you are worried about choosing a brush size, they are printed on the handle and if they are not, RUN! the brush is too cheap and is a waste of your money. Buy a great brush and look after it.


You will also need a non stick sheet. These are those beige Teflon ones - everywhere at the moment. However, if you have not got access to one and you need to do this tonight, try non stick baking paper. Even waxed paper. Experiment.

The first thing to do after choosing the paint colour and the stamp is to put a pea sized amount onto the non stick matting.


Spread it out with the brush until it is very thin and even.

Coat the stamp by pressing it onto the paint and then apply it to your project. et voila! A very crisp image.


So why bother, I hear you ask? Well, this paint is lightfast and waterproof. You can use it where you cannot use ink, paints come in an almost infinite number of colours and you can mix them for more. This is without talking about the benefits of being able to stamp white or light over dark and the whole world of metallic shades. You can use paint over transparent and translucent surfaces, layer them up and it is simply another way of approaching the subject. Acrylic is waaaay cheaper too, need I go on...Have a play anyway and see how you go.

There is a small warning though. Acrylic paint dries really fast. This is both a good and a bad thing. In particular, I am talking about your brushes and stamps. Wash them immediately in water. Never leave this task because once the paint is dry, it is dry. As I said, both  a good and a bad thing!

Thank you so much for stopping by!
See you next time,

Debs
xxx

Monday 2 December 2013

Leaves To Go With The Rose

Hi All!

Well here I am again and this time with the leaves that I promised you to set off your woven rose for paper craft. Have a look at the rose on its own.....


While you can clearly see that it is a rose, it is missing something. Now compare it with the one with leaves....


I think that you see what I mean! The green sets it all off beautifully and forms a nice frame/backdrop for the flower. I have added a little fern in there too and there will be a little more in the last photo but now let's see how this is done.

I used Mulberry paper in soft green and I cut out some leaves with a nice shaped leaf die and my Sizzix Big Shot. It doesn't really matter which leaf die you use. I think that most of us know what a rose leaf looks like so go with the nearest to that one that you can find.

Now grab a couple of inks in green and an applicator tool. I have used Shabby Shutters and Peeled Paint from Tim Holtz. I really love them and they blend beautifully. And why Mulberry paper? It is thicker, has a little texture and it makes a more substantial leaf over all. I prefer it for flowers too. Find it by name on eBay easily.

So, back to the leaves. Load the ink applicator and working from the outside in, colour the leaf 2/3 with Shabby Shutters ink. Change pads and colour 1/3 with Peeled Paint.


In the photo you can see the two leaves, the first one is uncoloured and the second is coloured with Shabby Shutters. PROMISE me that you will never just cut out a leaf and use it uncoloured- that is flat and uninteresting and you can do so much better. It is easy!

The next shot is of the too leaves again, this time to compare the two inks. the one on the right is the completed leaf. That is all there is to it!


See how vibrant the right leaf is? And how realistic with so little effort.

Finally, here is the rose with the leaves a a little more fern. It is ready to use. It can be worthwhile to make these on a rainy day and some leaves and foliage to go with them and put them in a box. It is great for using stash and they are ready to go in different sizes and colours.


I hope that you have had fun and if you have any questions at all, ask away! I am happy to help.

Thanks for stopping by
Debs
xxx

Friday 29 November 2013

Woven Ribbon Roses

Hi All!

I want to show you a new use for an old ribbon embroidery favourite this time - the woven ribbon rose! It is a really easy one to make and I have discovered a way to make it perfect for paper crafters. You can make it any size, just remember to scale down the size of the ribbon and the size of the paper scalloped circle if you make it smaller.

So, what do we need? Very little really, a small amount of reasonably thick paper, silk or faux silk ribbon, a co-ordinating colour embroidery cotton, a blunt, large eye needle and some glue. It is easier to use a die cutter (I love my trusty Big Shot) and an appropriate die. Again, Sizzix have some wonderful choices here. I like the scallped circle set   because it comes in several sizes so you can make several rose sizes.

Begin by cutting a paper circle. I have cut a dark pink one because my rose will be pink.


Now make a circle very lightly with pencil around the outside. My scallop is 10cm diameter and the circle is about  9cm. This does not have to be super accurate. If you are confident, you can go by eye or just mark five points aropund the perimeter.


Thread a needle with thread and bring the thread up through the centre of the circle (as near as possible) and down on one point on the perimeter. Keep going to make an odd number of 'spokes' like a wheel. I have made five.


Now thread a fairly large eyed needle with your ribbon (you will need about 1.5m; it is better to have too much than not enough, not enough means beginning again, more means a sumptuous rose), bring the ribbon up through the centre of the circle and begin to weave it in and out of the spokes, making the ribbon a little looser as you work towards the outside. The embroidery cotton is a co-ordinated colour so that if it is visible after the rose is made, it will not be so obvious.


Extra wide ribbon and a nice long amount of it means a really lovely, full blown rose. It doesn't matter if some of the paper circle is visible - this is why we choose a nice paper and a scalloped edge.


A note of warning out to be included here, remember that you are working on paper and that it will tear if you are too rough. Although I have suggested that you use a slightly heavier than normal paper, it will still not put up with too much so go carefully!

Hide the end of the ribbon under a petal with a dab of glue. I like my Dremel Glue gun for this. Now simply place the rose and it's decorative circle where it will look nice on the design. Glue in place. Think about using these on altered paper mache gift boxes. They look very nice and very vintage.

Next time, I will show you how to make an colour some realistic looking rose leaves to go with your blooming masterpiece!

Thanks for stopping by!
Debs
xxx

Pretty in Pink

Hey All!

I have been absent for a short while getting things out to my magazines - I am happy to say that November has been a record month and there is a lot of stuff heading your way for readers in the UK and the USA. Fun and I love my job! As they say, much better than working for a living!! Happy Days!

But in the mean time, I found the time to make a card and tag for you and here it is now.....it is a bit summery which is out of season for us here in the Northern Hemisphere but this little set is destined for Australia so, on their side of the world, all is good!


This is another DecoArt and Sizzix layout and Tim Holtz products feature heavily. It is also about texture and layers. And PINK!


Distress and layer the papers, ink the edges sew around the outside. I used Victorian Velvet Distress Ink from Ranger. Stamp the edges too and avoid black. I went with a pearl grey here to keep the look mistily romantic.


I ran one of the layers of paper through a lattice embossing folder too so that the flowers had a trellis. DecoArt have a wonderful product called Metallic Lustre. It is a thicker metallic mousse and applies wonderfully to a variety of backgrounds. Unlike the earlier generation of gilding waxes, it is also water soluble and water wash up. You can dry brush it on (as I did here) or water it down and paint it on. It can even be stamped on. More about that in a  later post.

I used the Champagne Ice colour anyway and it adds a subtle glow to the project. Here it is again and you can see how it brings out the texture.


Make the flowers next. Grab the Tattered Florals die and some mulberry paper in various pinks, layer them up real good! Dampening the paper after you have cut the flowers and scrunching them up will add dimension. Be respectful of the fact that they are paper though and have to be treated very gently when wet.

But when they are dry, open them up again and hot glue the layers together and put a pearl or rhinestone in the centre.

Leaves are really important and I have searched long and hard for the right ones. These are from Susan's Garden and I ran them through my trusty Big Shot (I love that so much that I cannot bear to be parted from it for a second) and then made veins with a stylus. Mowed Lawn Distress Ink and an applicator helped with the depth of colour on the edges. Make leaves in quantity and colour them in different inks for different projects. Maybe start a leaf box......this will make sense to you in just a moment!


I had a rummage through the ribbon and lace box next (yes I do have a ribbon and lace box...you should too! Start one today if you don't have one. It can go right next to the button box. What do you mean you don't have............) Anyway, I had a rummage through the ribbon and lace box and I found some white cotton lace and some really sweet pink rosebud braid that my friend Karen gave me. Perfect for this and these things are widely available from haberdashers everywhere.


I put in a bow to finish it all off and stamped the message onto a piece of pink paper.  The tag is along the same lines - to make it nice and smooth, make extra bits and bobs while you are making the card, the tag makes itself!


Well there it all is folks. i do hope that you liked it and found some inspiration. normal Christmas service will resume next time and I will try to not make it too long in coming to you.

Have a lovely day and thanks so much for stopping by!

Debs
xxx

A Card For My Lovely Mother-in-law

Hey all!

Now this must be some kind of record - three blogs in as many days! This time is a card set that I made for Rob's Mum. She is not really a pink flowery girl so this is a nice alternative.


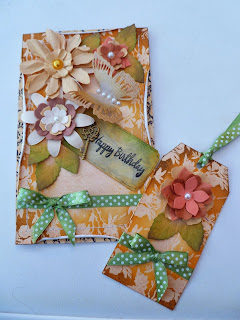
This lot features yellows and golds and of course a butterfly! this began with a dramatic piece of yellow and black paper,  then I distressed as really nice piece of self colored yellow paper with roses on. I used my trusty Tim Holtz Distress Ink in Wild Honey which really brought the heat embossed roses out a treat.

A green ribbon wrapped around the bottom thrid of the rose paper and surmounted by a matching bow gave focus to the bottom.


Paper flowers were the next thing needed and some punches and the Tim Holtz Tattered Florals die got a work out! Mulberry paper works well for these and layer them up. Pearls or rhinestones make really nice centres.


I am having great fun with leaves and inks right now and these were cut from a leaf die, veins put in with a stylus and then colored with distress inks - Crushed Olive and Mowed Lawn. Use the lightest one first and most and then come back in with a small amount of the darker one and leave plenty of layer one showing. It is amazing what you can do with some flat paper!

Sewing machine next! I sewed the rose paper to the black and yellow (go around twice) and then glue the flowers on. another die made a butterfly (ink the edges) and glue some pearls on for a body. Curl the rose printed paper back a bit with your fingers to make it look more interesting.

Finish it all with a bronze coloured key and a stamped tag. this can say anything but Happy Birthday was all I needed for this occasion!


The tag is made along the same lines.


Now glue the embellishment onto a white card and a white tag blank - advice to newbies....this means that all of your messy bits like ribbon and lace ends are tucked around the back where they will be hidden.

Thanks for dropping by!
Debs
xxx

Making Fall Leaves From Paper As Promised


As promised the other day, I am back with some step-by-step Autumn leaves made from paper. I have used the Tim Holtz Alterations Tattered Leaves die which I just love to bits! It is amazingly versatile and by changing the colours used in the ink choices, it can be re-jigged for any time of the year - although winter might be pushing it a bit!

Have a look at the finished article....


Now there is another leaf shape in there too. It is the Maple leaf from Marianne Designs which is great too and even puts in its own veins as you cut.

Anyway, you will need to gather these supplies:
-a piece of neutral coloured paper or medium-heavy weight card stock. I used a yellowy green
-medium stylus
-Tim Holtz Distress Inks (Ranger) in the following colours:
Crushed Olive (CO)
Peeled Paint (PP)
Wild Honey (WH)
Ripe Persimmon (RP)
Rusty Hinge (RH)
Walnut Stain (WS)
-Ink blending tool (Ranger)
-Tim Holtz Die Tattered Florals (Sizzix)
-Marianne Designs Maple Leaf die
-Sizzix Big Shot die cutter

Begin by choosing your leaves. work out how many you want and then cut them with the appropriate die cutter. Use the stylus to create a centre vein plus several side veins. Fold the leaf in half to deepen the centre vein.


Now load the blender tool with CO ink and sparingly ink the leaves, softly and at random. Work from the outside inwards.


Go back in with the PP ink and strengthen the green part.


As you can see, you can bail out at any time, depending on which effect that you want to achieve. I want a really red Fall effect so I have continued on with oranges and reds. The first russet colour is WH.


Now RP really brings the red out.


Continue on with RH....


Finally, and most sparingly, use some WS on the very edges to show where the leaves are starting to die off.


And here is one that I made earlier.....


That's all there is to it! Really easy and of course, gets better the more you practice. Put these in a box to keep on hand for Father's Day and Fall inspired scrapbooking and cards. They look fabulous in a bowl with some collected woodland objects too. This is without Halloween and Thanksgiving too.

Enjoy! And thanks for dropping by.
Debs
xxx

Making Fall Leaves From Paper

Hey all!

It is finally Fall - my time of the year, lovely cold, dark weather and no sun - perfect for crafting!

Now if there is something that I love, it is the Fall colors. Golds and reds and olives and all of those wonderful should-be-gaudy-but-they-aren't fiery hues.

Next challenge? To make them in paper and ink! Tim Holtz to the rescue this time. Enter a Tattered Leaves Die and some Distress inks and here is what I came up with....


What do you think?

I began with a plain piece of light olive paper and a piece of ecru. I cut two leaves and then scored some veins with a stylus and folded the leaf down the centre vein.

Next I used a foam applicator and softly applied Crushed Olive, Barn Door, Walnut Stain, Wild Honey and Spiced Marmalade inks. The Walnut Stain went last and was only applied to the very edges. I would like to experiment with torn bug holes too and see how that works out.

Watch this space over the next days and I will have a play with some more - may even attempt a step-by- step for you!

Thanks for stopping by!
xxx

Woodland Flowers

Morning Friends!

Firstly apologies for not getting back to you sooner - a small health glitch AGAIN. Honestly, I wish that I could rub this year out and start over! Anyway, let's not dwell on negatives.....

A couple of posts ago, I mentioned a walk in the woods to look for inspiration and materials. Well it is summer in England and that means flowers! I found a piece of birch branch too and suddenly the light over my head went on! The birch branch has made wonderful bases (after a little bit of surgery) for some flowers.

Take a look and tell me what you think!


                      A wildflower meadow!


These were really easy to do. But what will you need?

Pieces of birch wood with the bark still on.
Crochet circles in different colours
Buttons in assorted sizes and shapes
Beads in assorted styles, colours and shapes
large lucite leaves 
medium and small lucite flowers
Scraps of cotton fabrics to match the other things that you have collected
Felt for the bottom of the wood
PVA wood glue
Rusty craft wire
Dremel hot glue gun and glue sticks
Your normal beading and sewing requirements
Some basic tools including a saw, wire cutters and drill


Firstly, cut the birch branch into thick slices about 3 cm wide. The branch was about 4.5-5 cm diameter to begin with.


Then drill a hole in the top of the piece of wood. 


Cut a piece of wire about 15cm long. Curl the wire around a pencil or similar to make it a bit more interesting. The wire will become the flower 'stem'.


Insert one end of the wire into the hole. 


Cut rough flower shapes from the fabric and make the shapes a little larger than the crochet circles. Of course you can make the crochet circles yourself but if you are like me and lack the patience to crochet....they are available from larger craft stores and online too. Haunt ebay and Folksy a bit and see what you can find. I have an inexpensive and  small but growing selection in my Folksy shop, Witch Way. Keep the colours you choose nice and light for summer. As a rule, any Italian ice cream colours are just perfect!  

Anyway, back to the flowers.... cut the flower shapes. You can use a template if you have one or just make circles. 


Attach a crochet circle to the front of each flower shape.


Embellish with beads and buttons or even both!


Now stitch and glue the flower head to the wire stem so that they are quite secure. The hot glue gun is an absolute boon here.

Explore the possibilities with lucite flowers and beads. I have sewn and glued in two quite large green lucite leaves. They look fab and really lift the flower!


Glue a circle of felt to the bottom of the wood so that it protects polished surfaces and looks more professional.


Here are some that I made earlier....Experiment and use what you have. This is a very pretty collection to brighten up a window sill or go down the middle of the table.


Ring the changes by making some flowers larger than others and mix them up. Yo-yos (Suffolk puffs) look good on them too. Play around and grow a beautiful garden which never needs watering! remember though that the larger the flower head, the larger the wood has to be because the centre of gravity is quite high up, they need to be stable and if they are too top heavy, they will topple over.

*Please check with authorities before taking wood from the forest floor. This is usually fine but in some cases it is not so double check. The local council is another great place to get a wood offcut as a freebie. The council is always trimming something and if you ask very nicely, they will almost always gladly give you a small offcut.    

Thanks for stopping by!
Debs
xxx

The Simplest Earrings Ever!

Morning Friends!

I was playing around with beads and bits of wire (as you do...) and I made some very dainty and feminine earrings. I immediately thought of you and decided to share the make.They are a really cheap project too which is quite important and they are quick as a flash. 

Best of all, I had run out of ear wires so I made some which I think look even better. 


These are made with 6mm crystals in lilac but you could use anything at all really so long as it fits onto the hoopy bit (stop me if it is too technical!)

So what do you need and how did I make them?


You will need a couple of pairs of pliers, one flat nose and one chain nose.
You also need- 2 eye pins (5cm long)
               2 10 mm jump rings
               2 4mm jump rings
               2 6mm faceted crystal beads
               a marker pen or similar (a mandrel instead if you have one)

Step One:


Take the two eye pins and bend them around the marker pen to make the ear wires. doing it together helps to ensure that they will turn out the same. Ensure at this point that the wires at the 'back' are slightly longer than the front.

Step Two:

As you can see, the size of the tool is important when bending the ear wires - a marker pen is ideal and you will achieve a lovely rounded shape. Bend the 'eyes' on the eye pins around so that they are straight.

Step Three:


Use the pliers to open the larger of the jump rings and put the bead on. Because of the angle of the arc with these rings, the 6mm bead will not slide on easily. It will just go slightly past the split. What you have to do then is to 'persuade it very gently' to go on enough to close the hoop. Then bring the bead back to cover the opening. This ensures that the earring will not come apart and it looks neat and well finished.

Step Four:

Repeat step three for both earrings and then use the smaller jump ring to attach the decorated hoopp to the 'eye' of the eye pin.

Let's have a look at the finished article again....


They are great as last minute gifts and they are super for using up the last couple of really pretty beads.

What do you think?

See you again soon!
Debbie 
xxx