Wednesday 29 April 2020

Recessed zippers - how to take away the pain!

May I introduce the San Sebastian Shopper Tote!

Hi guys! I have been playing around with another pattern for my Etsy shop. This time it is the San Sebastian Shopper Tote and you can find it HERE.


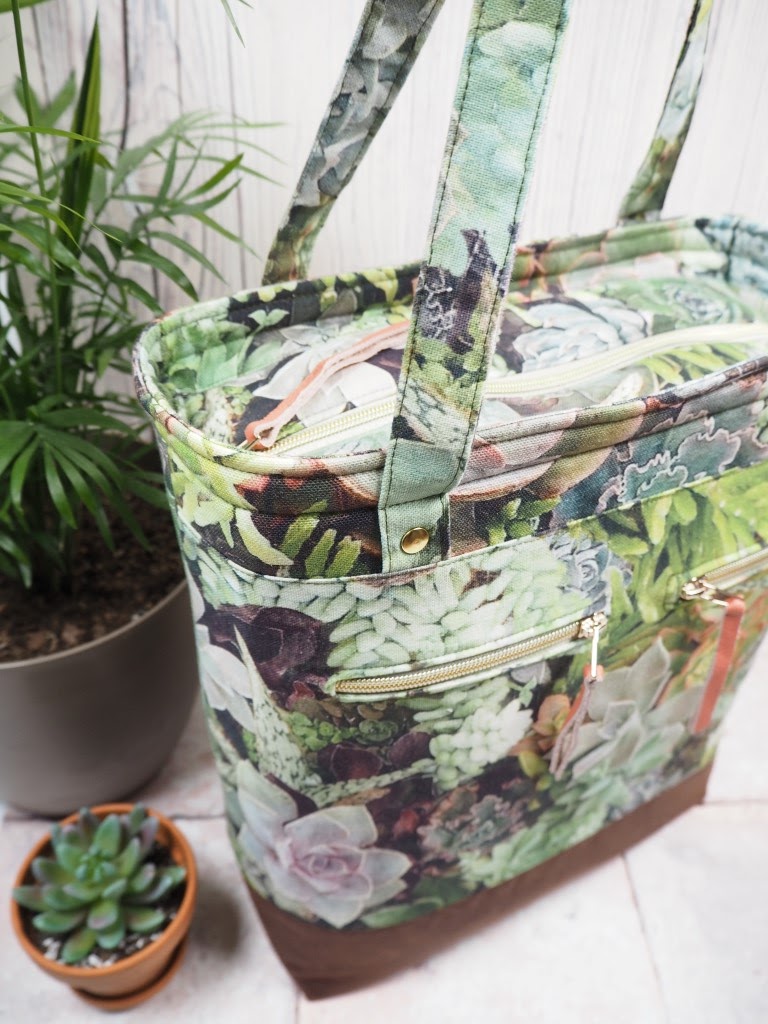
That fabulous (and easy to construct) recessed zipper gives great security.

This one has a few zippers and I thought that it might be time for another masterclass! We have already looked at zipper box pockets and this bag has a few of those too. HERE is the tute to help you with those. Don't worry that I have referenced another pattern. You can use the same techniques.


Learning these skills will make you feel like a bag making boss!

A recessed zipper is great for added security and it also gives your bag a bit of structure at the top.


The zipper end can be tucked in or left out- either way, its extra length allows you to open the recessed zipper all the way.

The main thing is to get your zipper foot out for this one! The right tool for the job is really important and with a zipper foot, you can get in a lot tighter than with a normal presser foot. Most modern machines come with a zipper foot as a standard accessory so have a rummage in that bag of tricks that came with the machine.


The long zip means that the bag can be fully opened.

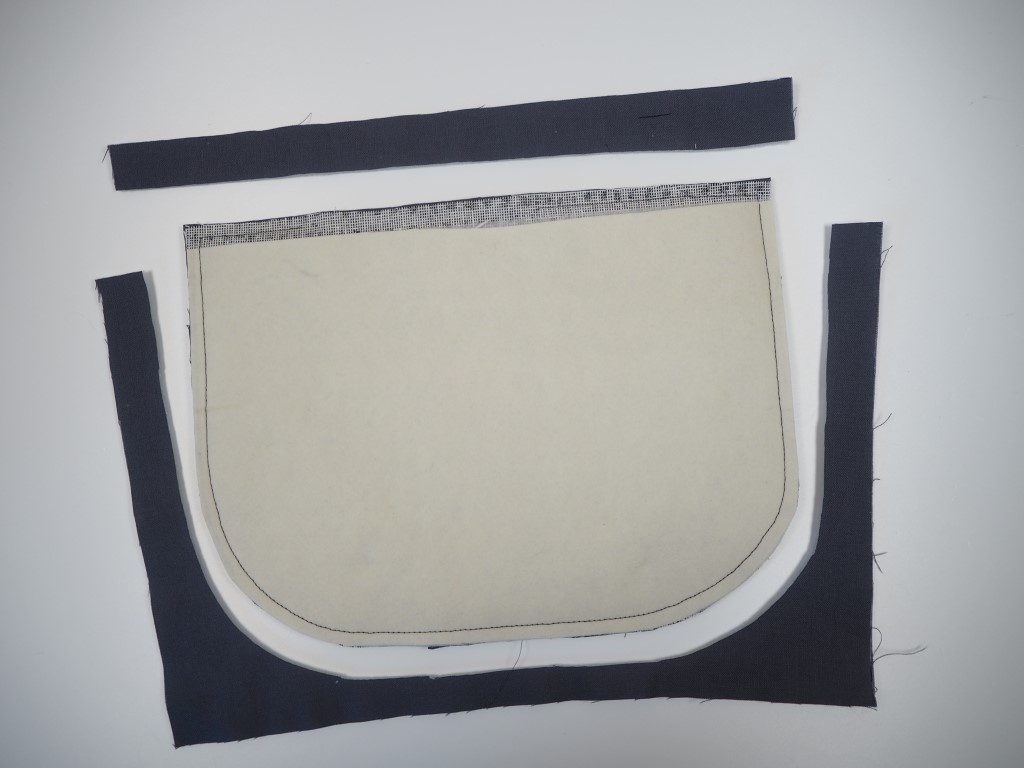
So to make a recessed zipper, we need a few things:
- your zipper (natch)
- the top panel
-the top panel interfacing (Style-vil by Vlieseline)
- the top panel lining
-the tab for the end of the zipper
You will also need the top inner trim and a piece of your lining so that I can show you how to put the zipper into the lining.


Never leave the details out! The delicate pink of the leather zipper pull echoes the pinks in the fabric.

The last three things on this list will be mentioned specifically in the pattern so cut them out and prepare them and meet me back here.

Right so you have the top panels interfaced with foam interfacing. They are then trimmed.  The foam at the end of the zipper which is not the opening end is a bit bulky to fold over so I like to go in about 1/2" and trim that back further.


Being on the lookout for and getting rid of bulk is an important job in bag making.

This extra piece of overhang is then folded over, pressed and glued to keep it in place like this


Glue is your friend! I love Aleene's Tacky glue and I use it where stitching might add yet more bulk. 

Prepare the zipper next. 
The end tapes where the zipper opens will either look like this if you are using a 'normal' zipper...


You can use any sort of zip.

or this if you are using a zipper on a roll....


This is the sort that i have chosen for the bag. it looks like metal but behaves like plastic. Winning!

Whichever you have, you need to fold the zipper tape ends to the side as near to the zipper opening as you can like this and stitch them to hold them there


It looks and feels a bit awkward but trust me, this is hoe it looks. The excess will be trimmed away when we get to that bit.

One end of the recessed zipper (the opening end) is almost right up against the end of the panels and the other end runs off the end of the panels and ends in a tab. Folding the zipper tapes back like this means that you get a lovely clean end where the zipper opens.

Actually come in 1/4" from the end like this to allow for the seam allowance


That 1/4" is important for the finished effect.
I baste the zip in first to keep it in place because once the lining goes on to make the sandwich, it is very difficult to see if the zip has stayed put.

Then add the lining (right sides together) and sew up the short end, along the zipper 


Your folded over zipper end tape will stick out like this.

Don't sew down the other short end just yet though. Just fold the lining up to match the glued outer end.


Those of you watching this carefully will see that my fold over is WAY more than the usual 1/4" seam allowance! That is because the lining usually stretches a bit as you sew. Don't worry too much (as long as it isn't excessive) and just fold the end to match the outer. The outer is the important one.

There will be a bit of bulk there on the corners so trim across being careful not to snick the stitches


Trim the zipper end off too where it sticks out at the side.

Turn the panel the right way out and press so that the edges are perfect.


Thanks to the bending over of the zipper tape end, this is what the recessed zipper should look like when you turn it out.
Then topstitch narrowly up the short side, along the zipper and then down the other short side.


Keep a hold on all of the layers as you topstitch so that there is no puckering.
The topstitching is what will close the flappy bits on the other end of the panel.


One side down and one to go!

You have made one side!!
Now repeat this on the other side and trim so that the whole shebang is as wide as the pattern directs.


Looking pretty good!

I like to baste the layers together too so that they are not too floppy. this makes it easier when you put the zipper together.

Now to apply the recessed zipper panel to the innards of the bag, take a top trim and your piece of lining and place them right sides together with one side of the zipper panel sandwiched in between


Basically act as though the zipper panel is not there and sew right along from beginning to end.

Sew right along trapping the zipper panel side in the seam


One side is done and as you can see, I have topstitched narrowly just above the seam. Topstitching is an important skill in bag making and it helps everything to stay put.

Repeat for the other side. You will now proceed with the lining as normal, sewing up the sides and base and leaving a turning gap in the base.


It looks like a hot mess at the moment but all is well and at this stage, you are ready to sew the sides of the lining following the pattern instructions.
Okay let's finish by putting the tab on the end of the zip. Take the tab and follow the pattern instructions to prepare it. Slip it over the end of the zipper and glue it in place.


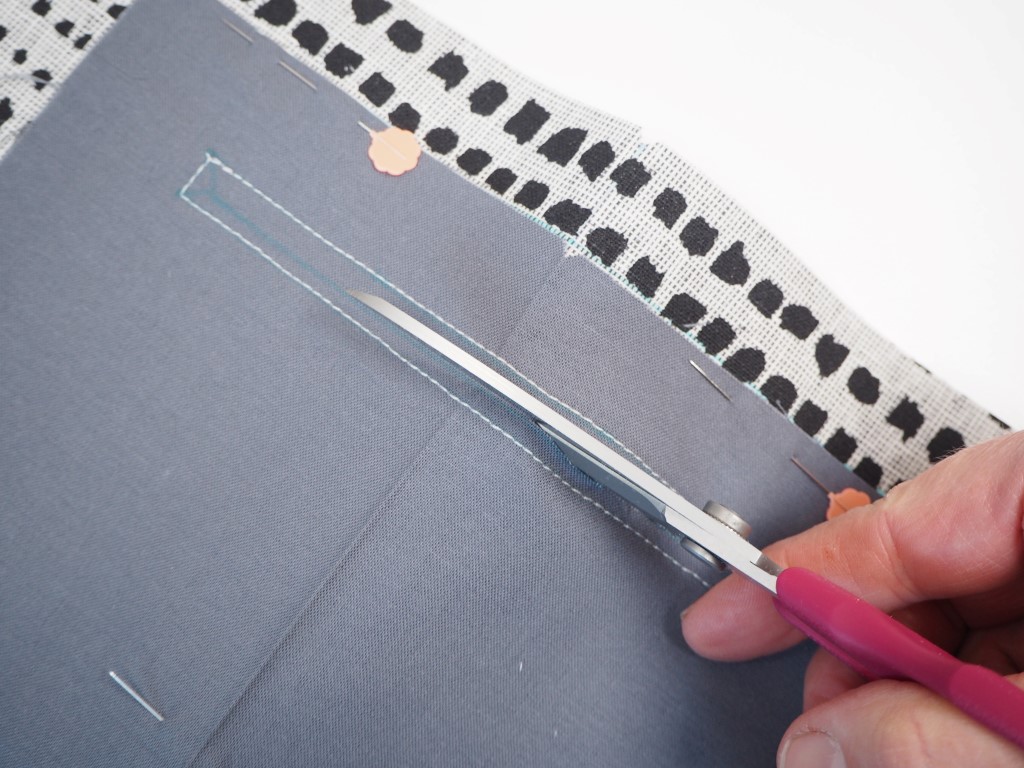
The pattern will tell you the dimensions and what to do to make the tab.

You will find that a lot of glue is used in bag making. It is a super handy addition to your kit.

Stitch it on now being careful to avoid any metal teeth.


The tab finishes the zipper beautifully.

And that's actually it! This will give you a really nicely constructed recessed zipper and the interfacing gives fantastic soft structure.


The bag can be completely sealed thanks to that recessed zipper.

The pattern referenced in this post is the San Sebastian Tote which you can find HERE

Happy bag making and stay safe!
Hugs
Debbie
xx

Tuesday 14 April 2020

How to construct a professional bag flap


I am so happy with the size and style of the new bag! It is just right for everyday use.

One of my (many) new years resolutions was to write more patterns for my Etsy shop and I am pleased to say that I have managed another one which you can find here.


As you can see, the flap can be a major design feature of a bag. It is important to get it right.

While I was writing it, it occurred to me that it is all very well to blithely rate a pattern as 'intermediate' or 'confident beginner' and then just leave people to assume what that actually means. What happens to people who fall through the cracks - they may not be a raw beginner but they still need a bit of help when it comes to construction techniques.

So I thought that the best way to be helpful is to choose a technique and focus on it in a sort of user friendly masterclass.


This lovely Anna Graham Fabric from her Driftless collection for Robert Kaufman is just perfect for this bag.
To give it real world relevance, I will be linking it back to a pattern so that you can see what the technique looks like in real life and where it would be used. You don't have to buy the pattern and the tute is free. You can use these techniques in any pattern.

Okay, so we will begin with a tute on how to create a professional bag flap. It has a few layers which may surprise you and the result is a bag part with a really nice feel to it which doesn't look sad and forlorn.


Cannot wait to road test this bag!

So what do we need to make a flap for a bag? You can substitute the following items for any pattern but for reference, I will be referring to my pattern so that things do not get too confusing. I use Vlieseline products. It is important to mention that here because some of their things do not have actual names, instead they have numbers and for a beginner, it can be quite confusing. So you need:

-H630 (see what I mean). This one is a light, low loft fusible fleece.
-Decovil I Light. A light but softly structured fusible interfacing.

So we only need two types of interfacing but it is the way that we will be layering them that counts as the real trick.


Attention to detail is so important in a bag.

Begin by cutting out your flap outer piece. There will mostly be a template for this but occasionally in a cut and measure pattern, you just cut a shape. And cut the lining piece without trimming it to the shape of the flap. This is quite important and I will get to that in a minute. the pattern will give you the sizes and details.

Now fuse the appropriate piece of H630 to the flap and the lining. This gives your flap a nice soft feel when you use it. Okay - trick number one, fuse the piece of Decovil I Light over the top of the fleece on the cutout flap.


A lot of layering of interfacing goes on in bag making. Here you can see the square lining with just the fleece and the flap has lining first and you can see the Decovil i light on the top of it.

This adds structure and it will end up being sandwiched between the flap outer and the flap lining both of which have the fleece there to keep things soft.
So you have two flap pieces, and one is still untrimmed. With the right sides together, lay the trimmed flap outer onto the untrimmed lining.


Sometimes I trim the interfacing back to keep it out of the back seam allowance especially on a thicker fabric. This is not the straightest of cuts but it doesn't have to be to be honest. 

Pin it well and get ready to sew. Before we do though, there is a very good reason for leaving the lining untrimmed. Fabric shifts. This is a matter of physics and not much you can do. It is thanks to friction. By leaving the lining whole to begin with, you guarantee a perfect fit and none of the frustrating running off of fabric that can happen when you cut the flap and the lining to fit. You still have the flap outer as a shape guide.

The next step is to sew it and cut it out using the flap outer as a guide.
That lining fits!

There is a tiny bit of waste but nothing too bad and it is well worth it to get a prefect flap.

Now there is a turning gap in the straight part of the flap at the back but if we turn it out now, the edge will pucker because there is way too much fabric there. When it is turned the right way out, the fabric has to negotiate the curve of the flap from the opposite direction, causing it to form a sort of frill. We have to get rid of some of the fabric.


And clip across the corners at the back too - this will sort of mitre them when the flap is turned the right way out.

You can see the little cuts there on the curves? This is how we get rid of some of the fabric and give what is left some room to move. Just make these with a small and sharp pair of scissors being very careful not to cut the stitching. Clip across the corners at the back too.


Again, be careful not to cut the stitching. I cannot BELIEVE how wonky my interfacing cut is up close :-)

Here is a closer one of the notches on the curve too


You need to get quite close to the stitching-use your best and sharpest small scissors for the job.

When the flap is turned the other way (the right way) out, they will all butt up together to smooth the curve.
Right, so turn the flap the right way out and press it so that the edges are perfect. This means that you cannot see the lining from the bag outer and you cannot see the outer from the lining side. Spend time and use a damp cloth to get a great result.
Then we close the gap.


I have pressed the gap edges in so that they are as invisible as possible and they are ready to be glued.

You don't want to stitch on the back just yet (more in just a bit) so a dab of glue will hold the back shut while you work on the rest. There is a lot of glue involved in bag making. It helps to stabilise things when you do not want an extra row of stitching. 

The next step is to topstitch. You will ideally have a perfect edge like this


The flap is on show so take the time to make the edge as perfect as possible. Imperfections here will draw the eye.

So the next step is to topstitch to keep it there. Sew the sides and the front of the flap only.


Make a narrow topstitch, not quite a 1/4". This looks better.

The reason for this is that we will topstitch the flap onto the bag and if you topstitch the back now, it will be stitched twice. This can look really clunky. This is why we glue the back shut to keep it in place too. We are saving the topstitching.

Not all bags have a flap attached like this one. Some have the flap integrated into the back seam. The individual pattern will guide you here but as a rule, in those cases, keep the back open. The raw edges will be hidden in the seam.

Hardware next! This is a really exciting bit because all of a sudden, your bag will start to look really professional. If you are using a stud, it will have a male and a female half (I know, I know but just look at the pieces and you will see why). We need to add the female half to the bag flap at this stage.


I love these Vario pliers by Prym. They take all of the mystery and hard work out of adding the hardware.

The male half goes on the bag front and that will happen later in the pattern.
So we have one final task and that is to topstitch the flap onto the back panel of the bag.


As you can see, the bag is not made up yet. The flap goes on now to make it easier later on.

I usually use a double row of topstitching for this. It is stronger and it looks nicely finished.

Okay! there you have it! It is actually easy to make a flap like this and once you try it, you will use the technique again and again.


It is worth making the flap as perfectly as you can. It is a major design element.
There is a second tute relevant to the Pasadena bag and that is on way next time.  You can find it here. I want to show you step by step how to construct the zipper box pocket at the back. It is actually super easy when you know how.

Thank you so much for dropping by and if you are in love with the Pasadena bag as much as I am, you can buy it here at my Etsy shop. And by the way, there is a 20% off sale on in my shop until the end of April.

Hugs
Debbie
xx


Disclaimer: I have mentioned several products by name in this post. I do not receive any money for doing this. I simply believe that these products are the best and i use them again and again.


How to make a zipper box pocket in a bag.

The newest pattern in my Etsy shop is the Pasadena bag.

In my last post, I explained about how to make a professional looking flap for a bag. You can find that free tute here. I have been spending some time lately writing some bag patterns for my Etsy shop which you can find here and the newest of these is the Pasadena.

It occurred to me though that some patterns assume an awful lot of knowledge and some people need a bit more help with some things.


The Pasadena Shoulder Bag is the perfect bag for every day- not too big and not too small.

So I have decided to write a couple of tutes focusing on one or two techniques to help you to make better bags.

This time it had to be something to do with zippers! For some reason they strike fear into the hearts of most makers and it really doesn't have to be like that. There are some things to think about and some equipment to have to hand but the good news is that you  probably already have it!


Metal zips always look professional.

Your individual pattern will tell you what you need to make each zipper pocket with. You can use this technique on any bag pattern in the world but for ease of explaining, I will be referring to mine.

So you will probably have assembled your bag making 'ingredients' by now and we begin by prepping the zip. The zipper tapes at the opening end are not secured. However, your life will be a lot easier if you stitch them together to stop them from moving about.


LOVE metal zippers! Nothing looks better. However, on the lining I always use plastic because it is less bulky.

I have used a lighter thread here so that you can see what is going on. You would use one to match the zipper though because it will be visible from inside the pocket with this technique.
When you are putting the zip in, you don't want it to move about too much. You can baste the zip in place but I find that the easiest thing to use is some very thin (about 1/4") double sided tape on each side of the zip.


This can gum up your needle so be prepared to wipe the needle after sewing. 

Put the tape as far to the edges of the zipper tape as you can to keep it away from the needle if possible. It doesn't really matter. It is just that some tapes will gum the needle up and this can cause skipped stitches (if you are having skipped stitches after putting in a zip, this could be the reason). Some alcohol gel will wipe the needle clean.

Next we have to make some marks to show us where to put the zipper pocket.


Find the vertical centre and mark it. This will make all of your other measurements easier.

The pattern will tell you how far down to measure on the bag. The basic idea is that you measure down from the top edge and then place the zipper box pocket lining on that mark. Choose one short end of the pocket lining to pin. It doesn't matter which. The other short end will be brought up to finish the pocket off at the end.


This beautiful pattern is not quite straight on the fabric (that is the idea) so measure your lies from the top of the panel and don't always rely on a pattern to help to get things straight.

The pocket lining goes far enough down so that it doesn't get caught up in the  top edge or the flap. The pattern gives all of these measurements so we don't need to worry about them here.
Pin the pocket right sides  together (doesn't matter so much with solids) onto the line that the pattern tells you to draw.

Next (and again the pattern gives the details) draw a horizontal box.


As you can see, I have creased the lining. This gives me the vertical centre and I line this up with the original vertical centre line. That way I KNOW that the pocket is dead centre.

This will be your sewing line. It has to be right on the vertical centre so that your pocket will be central. This is another one of these things that matter when bag making. Take the time to fuss at this stage and check everything at least twice!

The cutting line comes next.


Those angles at either end of the line are important!

This one has some angles at each end of the line and the line itself doesn't extend quite all the way to the end of the sewing box.
The angles are there to ensure that there is no puckering when the pocket is turned out. Here again, as for the flap tute, it is all about how the fabric behaves when it it turned the right way around. If the angles are not there and not cut when we get to that bit, the fabric will pull because it has nowhere to go.
Sew around the sewing box next.


The sewing box will form the edge of the seam on the pocket opening.

The next bit can be a bit scary - cut along the cutting line including the two angles at either end.


When you get to the angles, be careful not to cut the stitches. Go slow and really concentrate.

Cutting the angles releases the tension on the fabric and stops puckering.


It can be a bit nerve wracking if you are new.

The next thing is to gather all of the pocket fabric up and 'post' it through the hole. Smooth it out on the back and press so that the edges are perfect.


A damp cloth when you are ironing makes a beautiful edge.

As you can see, be careful about relying on the printed pattern on the fabric - that pocket aperture is straight! Let's have a look at the back.


There is a tiny bit of puckering at the corners (this was before a steam press) and they disappeared after ironing. The magic of those angles!
The zipper goes in next.


Line up the zip well and use the tape to keep it in place.
Remove the release paper from the double sided tape and line the zipper up in the aperture. 


The tape really helps!

As you can see, the first stitches that you put in the zipper tape to stabilise it is visible. The one drawback of this method is that the zipper tape will remain visible on the inside of the pocket. But almost all bags use this method so we need to learn it.
Swap to your zipper foot and topstitch the zipper in from the right side.


The narrow zipper foot (which should come with your machine or be available quite cheaply) can get much closer in than the usual presser foot.
Make your stitching as straight and as neat as possible because it will all be on show. This is yet another reason for using matching thread.
Okay so the zipper is in (and the magic trick is to use that zipper foot. The right tool for the job). The next thing is to finish the pocket.

Bring the other short end of the pocket lining up to meet the first and pin. Fold the outer panel out of the way and sew the pocket lining top and sides.


Keep that pocket outer out of the way as you sew!

When the pocket is finished, it will look like this


Those pieces which extend over the edge of the bag at the bottom can be simply trimmed away. The seaming of the bag will hold the pocket down too.

There are often some bits which hang over


Square peg, round hole.

Just lop them off using the bag outer edge as a guide. This happens when a round bag has a square pocket.

Yippee! Finished! It really isn't difficult once you know how to do it (like just about most things). These pockets are often found on bags and the higher end bags will almost certainly have a zipper somewhere so it is a skill worth knowing.


A handy zipper pocket is a secure must-have for any bag.


If you love the look of the Pasadena bag, you can buy it here in my Etsy shop.

Thank you so much for stopping by. I hope that you are inspired and helped by this tutorial and that zippers are not so scary anymore.

Hugs Debbie
xx