 |
| The newest pattern in my Etsy shop is the Pasadena bag. |
In my last post, I explained about how to make a professional looking flap for a bag. You can find that free tute here. I have been spending some time lately writing some bag patterns for my Etsy shop which you can find here and the newest of these is the Pasadena.
It occurred to me though that some patterns assume an awful lot of knowledge and some people need a bit more help with some things.
 |
| The Pasadena Shoulder Bag is the perfect bag for every day- not too big and not too small. |
So I have decided to write a couple of tutes focusing on one or two techniques to help you to make better bags.
This time it had to be something to do with zippers! For some reason they strike fear into the hearts of most makers and it really doesn't have to be like that. There are some things to think about and some equipment to have to hand but the good news is that you probably already have it!
 |
| Metal zips always look professional. |
Your individual pattern will tell you what you need to make each zipper pocket with. You can use this technique on any bag pattern in the world but for ease of explaining, I will be referring to mine.
So you will probably have assembled your bag making 'ingredients' by now and we begin by prepping the zip. The zipper tapes at the opening end are not secured. However, your life will be a lot easier if you stitch them together to stop them from moving about.
 |
| LOVE metal zippers! Nothing looks better. However, on the lining I always use plastic because it is less bulky. |
I have used a lighter thread here so that you can see what is going on. You would use one to match the zipper though because it will be visible from inside the pocket with this technique.
When you are putting the zip in, you don't want it to move about too much. You can baste the zip in place but I find that the easiest thing to use is some very thin (about 1/4") double sided tape on each side of the zip.
 |
| This can gum up your needle so be prepared to wipe the needle after sewing. |
Put the tape as far to the edges of the zipper tape as you can to keep it away from the needle if possible. It doesn't really matter. It is just that some tapes will gum the needle up and this can cause skipped stitches (if you are having skipped stitches after putting in a zip, this could be the reason). Some alcohol gel will wipe the needle clean.
Next we have to make some marks to show us where to put the zipper pocket.
 |
| Find the vertical centre and mark it. This will make all of your other measurements easier. |
The pattern will tell you how far down to measure on the bag. The basic idea is that you measure down from the top edge and then place the zipper box pocket lining on that mark. Choose one short end of the pocket lining to pin. It doesn't matter which. The other short end will be brought up to finish the pocket off at the end.
 |
| This beautiful pattern is not quite straight on the fabric (that is the idea) so measure your lies from the top of the panel and don't always rely on a pattern to help to get things straight. |
The pocket lining goes far enough down so that it doesn't get caught up in the top edge or the flap. The pattern gives all of these measurements so we don't need to worry about them here.
Pin the pocket right sides together (doesn't matter so much with solids) onto the line that the pattern tells you to draw.
Next (and again the pattern gives the details) draw a horizontal box.
 |
| As you can see, I have creased the lining. This gives me the vertical centre and I line this up with the original vertical centre line. That way I KNOW that the pocket is dead centre. |
This will be your sewing line. It has to be right on the vertical centre so that your pocket will be central. This is another one of these things that matter when bag making. Take the time to fuss at this stage and check everything at least twice!
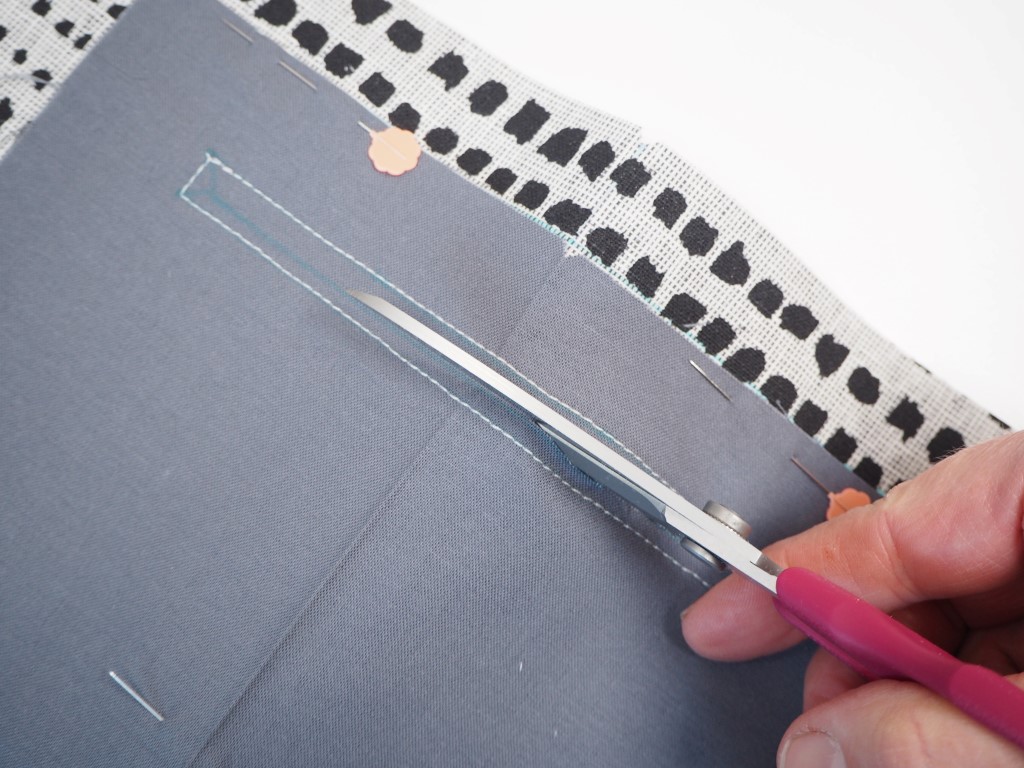
The cutting line comes next.
 |
| Those angles at either end of the line are important! |
This one has some angles at each end of the line and the line itself doesn't extend quite all the way to the end of the sewing box.
The angles are there to ensure that there is no puckering when the pocket is turned out. Here again, as for the flap tute, it is all about how the fabric behaves when it it turned the right way around. If the angles are not there and not cut when we get to that bit, the fabric will pull because it has nowhere to go.
Sew around the sewing box next.
 |
| The sewing box will form the edge of the seam on the pocket opening. |
The next bit can be a bit scary - cut along the cutting line including the two angles at either end.
 |
| When you get to the angles, be careful not to cut the stitches. Go slow and really concentrate. |
Cutting the angles releases the tension on the fabric and stops puckering.
 |
| It can be a bit nerve wracking if you are new. |
The next thing is to gather all of the pocket fabric up and 'post' it through the hole. Smooth it out on the back and press so that the edges are perfect.
 |
| A damp cloth when you are ironing makes a beautiful edge. |
As you can see, be careful about relying on the printed pattern on the fabric - that pocket aperture is straight! Let's have a look at the back.
 |
| There is a tiny bit of puckering at the corners (this was before a steam press) and they disappeared after ironing. The magic of those angles! |
 |
| Line up the zip well and use the tape to keep it in place. |
 |
| The tape really helps! |
As you can see, the first stitches that you put in the zipper tape to stabilise it is visible. The one drawback of this method is that the zipper tape will remain visible on the inside of the pocket. But almost all bags use this method so we need to learn it.
Swap to your zipper foot and topstitch the zipper in from the right side.
 |
| The narrow zipper foot (which should come with your machine or be available quite cheaply) can get much closer in than the usual presser foot. |
Okay so the zipper is in (and the magic trick is to use that zipper foot. The right tool for the job). The next thing is to finish the pocket.
Bring the other short end of the pocket lining up to meet the first and pin. Fold the outer panel out of the way and sew the pocket lining top and sides.
 |
| Keep that pocket outer out of the way as you sew! |
When the pocket is finished, it will look like this
 |
| Those pieces which extend over the edge of the bag at the bottom can be simply trimmed away. The seaming of the bag will hold the pocket down too. |
There are often some bits which hang over
 |
| Square peg, round hole. |
Just lop them off using the bag outer edge as a guide. This happens when a round bag has a square pocket.
Yippee! Finished! It really isn't difficult once you know how to do it (like just about most things). These pockets are often found on bags and the higher end bags will almost certainly have a zipper somewhere so it is a skill worth knowing.
 |
| A handy zipper pocket is a secure must-have for any bag. |
If you love the look of the Pasadena bag, you can buy it here in my Etsy shop.
Thank you so much for stopping by. I hope that you are inspired and helped by this tutorial and that zippers are not so scary anymore.
Hugs Debbie
xx
Fantastic, thank you, cant wait to try this
ReplyDeleteThank you so much for your feedback Sandy! It is a great skill for a bag maker to have. Happy sewing! xx
ReplyDelete