Hey all!
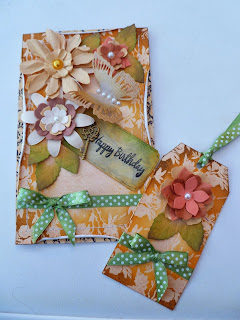
Now this must be some kind of record - three blogs in as many days! This time is a card set that I made for Rob's Mum. She is not really a pink flowery girl so this is a nice alternative.
This lot features yellows and golds and of course a butterfly! this began with a dramatic piece of yellow and black paper, then I distressed as really nice piece of self colored yellow paper with roses on. I used my trusty Tim Holtz Distress Ink in Wild Honey which really brought the heat embossed roses out a treat.
A green ribbon wrapped around the bottom thrid of the rose paper and surmounted by a matching bow gave focus to the bottom.
Paper flowers were the next thing needed and some punches and the Tim Holtz Tattered Florals die got a work out! Mulberry paper works well for these and layer them up. Pearls or rhinestones make really nice centres.
I am having great fun with leaves and inks right now and these were cut from a leaf die, veins put in with a stylus and then colored with distress inks - Crushed Olive and Mowed Lawn. Use the lightest one first and most and then come back in with a small amount of the darker one and leave plenty of layer one showing. It is amazing what you can do with some flat paper!
Sewing machine next! I sewed the rose paper to the black and yellow (go around twice) and then glue the flowers on. another die made a butterfly (ink the edges) and glue some pearls on for a body. Curl the rose printed paper back a bit with your fingers to make it look more interesting.
Finish it all with a bronze coloured key and a stamped tag. this can say anything but Happy Birthday was all I needed for this occasion!
The tag is made along the same lines.
Now glue the embellishment onto a white card and a white tag blank - advice to newbies....this means that all of your messy bits like ribbon and lace ends are tucked around the back where they will be hidden.
Thanks for dropping by!
Debs
xxx


No comments:
Post a Comment
Thanks for stopping by - I would love and welcome any feedback. Debs xxx